Thanks for Volunteering with us on Saturday!

Thanks for Volunteering with us on Saturday!

Photo by Hannah Berman

October 17. 2015

We had a great turnout of students, parents, and other community members on Saturday for our Fall Volunteer Garden Workday!

Check out everything we did in just a few hours:
*Huge thank-you to HANNAH BERMAN, for these beautiful photos! 

Photo by Hannah Berman

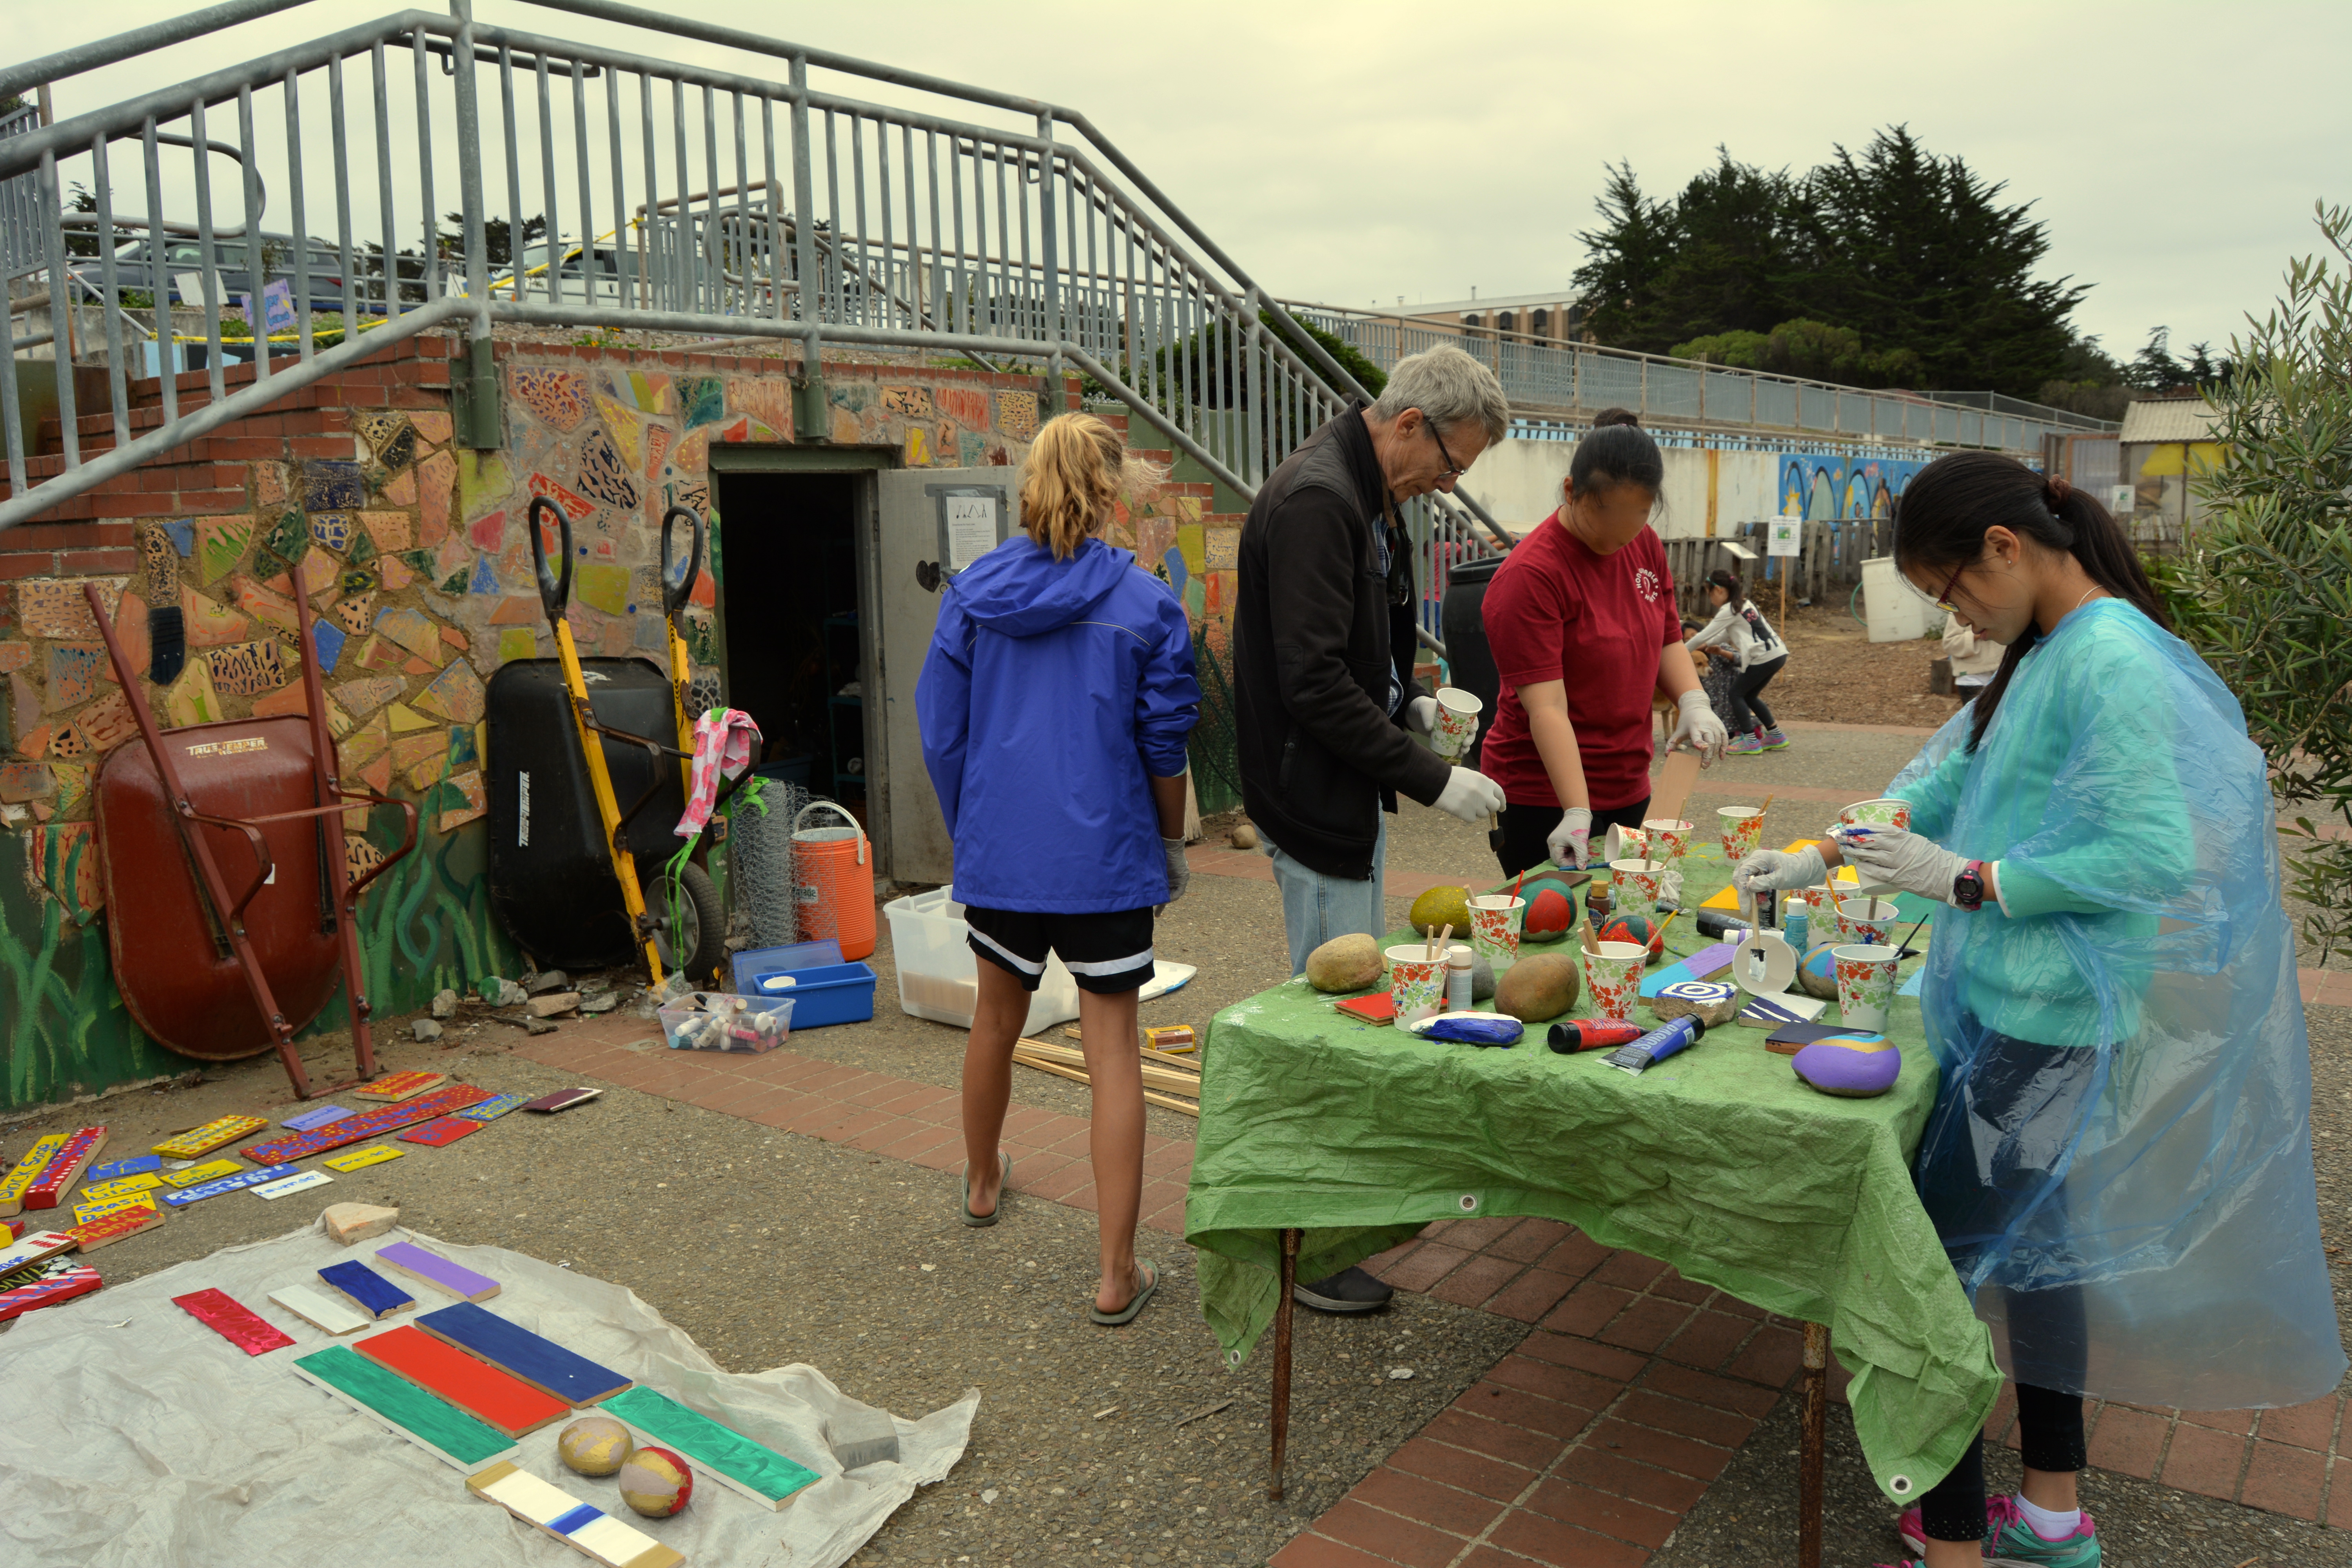
Painting garden signs on wood and rocks   

Photo by Hannah Berman

Some beautiful foundations for our garden signs                                                                       

Photo by Hannah Berman

Transplanting strawberries from garden beds into food forest/orchard area

Photo by Hannah Berman

Preparing our cob oven for a wet winter!      Step 1: cover and staple oven with chicken wire

Photo by Hannah Berman

Step 2: Mix stucco and apply to oven, scrape down

Photo by Hannah Berman

We even harvested these giant onions!                       *Tip: to grow big onion bulbs like this, really loosen your soil beforehand and add lots of organic material (like compost)

Photo by Hannah Berman

Ginger approves.

If you were able to stop by, thanks again!  If not, catch us next time!  Next volunteer day TBA
In the meantime, if you’re looking to volunteer, we always need help at our garden club days during lunch (Noon-1pm on Tuesdays and Thursdays) 
Contact Miss Kasey to sign up at 413-663-4334 or kaywoot@gmail.com

*We will also be having a Garden Farmer’s Market on Thursday, October 29th after school between the school and the Ortega Library

All produce sold in exchange for a donation, including:

-Salad mix with cherry tomatoes

-Greens (kale, chard, sorrel)

-Herbs (thyme, oregano, sage, rosemary, Vietnamese Coriander, lemon verbena, mint)

-Flower bouquets

-Carrots

-Plant starts good for fall

-Also for sale, San Francisco raw honey for $10/half pound jar

*If you are not able to attend, please contact Kasey to set up a different time to get your garden goodies!

Thanks & see you next time 🙂

“May I Have More Salad, Please?”

mustard harvest

Harvesting some mustard out of a mixed greens bed –Photo by Adrienne Klopf

Something strange and unusual is happening in the outdoor classroom these days.  Students can be overhead saying crazy things like, “I want to wash the dishes!,” “let me pick up the trash,” and “can I have more salad, please?”  Some students were even reported to ask for 3rd servings of the leafy greens.  While this might just be a parent’s dream, there does appear to be a steady harvest of greens leaving the garden beds so something is up.  Don’t worry, we’re planting more!

Succession planting allows us to enjoy fresh greens throughout the year.  If you plant new seeds every couple of weeks, you’ll never be caught by surprise with bolting or bitter-tasting lettuce.

IMG_1588

Classes and lunchtime gardeners have been chowing down on salad every day the past couple of weeks and the trend doesn’t seem to be slowing.  We’re looking to get at least 3 servings of vegetables every day.  That’s 2 cups of salad per serving, folks!  Students found the sweet secret to making salad extra scrumptious: San Francisco honey!

Our favorite simple salad dressings:

Vinaigrette
3 parts olive oil
1 (ok, maybe 1.5) parts honey
1 part balsamic vinegar
Lemon, pepper, and salt to taste
We like to add chopped mint leaves to the mix sometimes too!

Miso Salad Dressing
2 tbsp miso paste (any color is fine! I like to use red)
2 tbsp olive oil
2 tbsp fresh lime juice
1 tbsp soy sauce
1 tbsp rice vinegar
1-2 tsp sesame oil
1-2 tsp sugar
Optional: Garlic, ginger, mustard

For other fun dressings to try, look over these 50 recipes for homemade dressings!

Fava bean leaves

Students find some fava bean leaves to add to the salad –Photo by Adrienne Klopf

Looking to grow your own salad?  We love the taste of:
Fava bean greens–They grow well in the our climate and add nitrogen to the soil!
Arugula–Easy to start from seed and adds a spicy, peppery flavor (compare to store-bought and you’ll taste the difference!)
Mustard greens–Baby greens that taste like wasabi according to the young gardeners
Nasturtium flowers–Adds color and spice to our greens…while nasturtiums grow well here and are easy to maintain, be careful with this plant as it can take over an area!
Purple turnips–Easy to grow, creamy texture, and zangy bite
Spinach and lettuce–Plant them in a partially shaded area as we move into warmer weather

When you harvest your greens, take 20% or less of the leaves and remove outer leaves.  This will allow the plant to recover and produce more leaves for consumption!

Spring Cleaning and Community Efforts!

Thank-you to all of the volunteers who came out to help with the orchard pruning workshop and the volunteer work day on February 15th!

Check out some of the amazing work students, faculty, and parents accomplished:

The Earth Shed nearly sparkles after powerhouse parents cleared, sorted, and organized all of its contents

The Earth Shed nearly sparkles after powerhouse parents cleared, sorted, and organized all of its contents

A brand new bed was built to replace a failing one.  Students worked with Mr. Johnsen and Farmer Ben to construct this beauty. Check out our DIY cloches serving as mini greenhouses for new transplants

A brand new bed was built to replace a failing one. Students worked with Mr. Johnsen and Farmer Ben to construct this beauty.
Check out our DIY cloches serving as mini greenhouses for new transplants

An apple tree starting to bloom in the lower garden All 25 fruit trees were pruned as part of our workshop--lemons, limes apples, pears, and plums!

An apple tree starting to bloom in the lower garden
All 25 fruit trees were pruned as part of our workshop–lemons, limes apples, pears, and plums!

Please come out to our next volunteer work day in April! Date to be announced

*****************************************************************************************************
How to prune your young fruit trees in the dormant season?

Things to keep in mind as you prune:
-Leaves need sunshine in order to photosynthesize and provide energy to developing fruit.  Remove branches that block out other branches’ sunlight and develop a shape that encourages all of the leaves to receive sunshine.
-Use sharp tools to reduce injury to plant
-Always cut above a bud that is facing in the direction you would like the branch to grow

Step 1: Remove dead, decaying, or diseased branches
Step 2: Decide the shape you’d like your tree or continue with the shape that was already established
Open-center trees look like a candelabra and have the trunk topped in the middle, allowing 4 to 6 main branches to share dominance.
Modified central leaders have two whorls of branches: the bottom one with 4 to 6 branches all the way around the tree and a top whorl with 3 to 4 branches
Step 3: Select the strongest branches that you would like to keep.  Branches connected to the trunk at wider angles are better (somewhere between 45 and 90 degrees; 60 degrees would the Goldilocks number).  Remove small branches or limbs that compete with other branches.
Step 4: Head all of the branches you would like to keep.  This means cut the branch 50% or more to encourage more vegetative growth from that branch.  Remember to cut it just above a bud that is facing the direction you’d like your branch to grow.
Step 5: Remove fruit and flowers from trees under 3 years old.  It needs that energy to produce strong roots and canopy

*Since citrus trees are evergreen, they can be pruned any time of year and should be pruned throughout the year to reduce shock to the tree.  If you use organic fertilizer or compost, add to citrus trees in Spring, Summer, and Fall
Too confusing?! Come out to the Fruit Tree Pruning Workshop at AP Giannini next year!  Date TBA

Studying Adaptations in the Garden

IMG_1538

Students set their creative and collaborative energies in motion this week in the exploration of plant adaptations.

In some students’ words,

“Adaptations are changes a plant makes in order to survive in an environment.”

They allow plants to live in a place that might not have the best resources.”

Adaptations to plants are like us putting on coats and gloves”

Classes broke into groups and set out to find plant parts in the garden to make their own original plants, complete with adaptations to live in either the jungle, the desert, or the tundra.

IMG_1540

Can you guess where this plant adapted to in order to survive?

Farmers Market and Plant Sale this Friday May 9th!

photo-14

Beacon after school program students have fun running the farm stand on their own.

Thanks to all the students, teachers and parents who supported the sale last week!

We will be running the sale one last time this Friday during lunch and after school this Friday. Thanks to all the students, teachers and parents who supported the sale last week.

Come and support our garden program by buying vegetables and plants that were planted by APG garden students! This week all plants will be sold by donation ( name your price)  and everything must go!

Your support will help us raise money for improvements in our garden such as a new storage shed, cob bench, new wheelbarrows, seeds, tools and more!

The APG plant sale and farmers market will be held at the following times…

-Friday, May 2nd- Lunch time- In the garden

-Friday, May 2nd- After school 3:45-5:00pm- Located between APG and the public library.

photo-17

these students are very proud of their summer squash plants.


photo-18

photo-19


APG Plant Sale and Farmers Market!! Friday May 2nd and Sunday May 4th

photo-10

Spring is in full effect and that means it’s time to start planning for your summer garden!

Come and support our garden program by buying vegetables and plants that were planted by APG garden students!

Your support will help us raise money for improvements in our garden such as a new storage shed, cob bench, new wheelbarrows, seeds, tools and more!

The first APG plant sale and  farmers market  will be held three times this week…

-Friday, May 2nd- Lunch time- Garden

-Friday, May 2nd- After school- 3:45-5:30 pm.  In front of door near after school pickup

-Sunday, May 4th- 10-4pm- In garden during cob oven workshop

photo-18

We will be selling three varieties of kale, red russian, lancinato( dino kale), and curly kale.

We will be selling plants from different summer varieties….

Plant Starts:

-Summer squash- zucchini, yellow, lemon squash

-Corn- Dent and Sweet

-Beans- Scarlet runner and Ojo De Cabra, and string

-Cucumbers

-Sunflowers

Veggies, Herbs and Seeds:

Seed balls- Calendula, mustard and carrot seeds

Mustard greens

Kale

Chard

Dry Lavender bundles

and more!

All vegetables and plants are sold by suggested donation! All items are available on a first come first serve basis. We have a limited supply of certain items and more of others. If the sale goes well we will continue to have a farm stand on Fridays through the rest of the school year.

Contact Lindsey Whited with any questions, lindseymariewhited@gmail.com.


IMG_5035

Here Mr. Rothman’s class is organizing plants by type.

IMG_5042

We planted two varieties of sunflowers, teddy bear and autumn beauty.

IMG_5043

Here 6th graders are labeling the plants they planted with the type of plant, variety and date.

Natural Bulding Cob Oven Workshop Day 1

photo-8

Thanks to all the parents, students and community members who came out on April 12th for our first natural building cob oven workshop. We had so much  fun getting our hands and feet in the clay, we made a great team. ! We are one step closer to firing up garden veggie pizzas and other baked goods for our community!

Next oven building workshop is Sunday, May 4th from 10-4p.m.

Here are a few pictures showing the step-by-step process of building the base. 

\\photo

The first step of building the oven is laying the foundation. Davin from Eco-SF stamped down the drain rock so we had a flat service to build on.

photo-1

We used urbanite (broken up sidewalk) that was delivered for free from the DPW. Urbanite is an abundant city resource that can be used for building. It was important to stack it tightly  together to have a strong foundation.


photo-3

One of the best parts of natural building is getting to use your feet to mix the clay. We used a ratio of 1 bucket of sand to 2 buckets of clay. We added a little bit of water to make it all stick. The mix we used for the base isn’t cob because it is absent of straw. The mix we made is more of a mortar to help hold the urbanite in place.

photo-4

So much fun!

photo-2

Here Davin shows us how to check our mix. You mold it into a ball then drop it on the ground to see how well it holds together.

photo-5

Once the clay mortar was finished we started placing it around the urbanite to help everything stack together firmly.

photo-7

photo-6

Once the base was at the desired height we starting filling wine bottles in the center. The air in the wine bottles act as a barrier between the oven it’s self and the base to the base doesn’t conduct heat.

photo-9

Group shot! A beautiful day of  team work and community building!

Growing Soil: The “Om” Solution

IMG_4916

What is “Om”?

Om isn’t just the mantra we chant while meditating or doing yoga, in the garden it also refers to organic matter.

The 6th grade classes learned that the reason we want to make organic matter in the garden is so we can provide nutrients to our plants. The more organic matter we create the more life we create. In nature 1 inch of organic matter takes 1,000 years to accumulate. In the garden we can make organic matter, also known as compost, in a few short weeks.

All the 6th grade classes learned how to make compost in the garden in two different ways, through our 3 bin compost system and vermi-composting( worm composting).

In our three bin system we use dead plants from the garden and some food scraps along with straw and chicken poop to create healthy rich compost that we can use in the garden.  We create layers  in our compost cake, the  greens being (nitrogen) and browns being (carbon). Even though chicken poop is mostly brown it is actually a great source of nitrogen for our pile. Making compost is an aerobic process, meaning it needs air to break down. In the garden we usually flip the pile 2-3 times per week to help speed up the decomposition process.

IMG_4919

Here students flip the compost to incorporate more air into the pile and chop dead plants into small pieces so they will break down faster.


Vermi-Composting is a fast and efficient way to make compost and recycle food scraps. Composting worms, also known as red wrigglers, can eat half their own body weight or more every day. This means that after adjusting to their new home, 1 lb. of worms will eat approximately 1/2 lb. of food each day.

IMG_4918

Students sort through old worm casting to find worms to add to our new worm bins.

Steps for building a worm bin-

1. Sort worms

2. Rip up newspaper and get it wet, like a rung out sponge.

3. Get two bins that can be stacked inside each other. Drill holes in the bottom of the top bin so the worm castings( worm poop) will fall to the bottom bin for easy collecting. Drill holes on the sides so worms can breath.

3. Add worms to bottom bin on top of some wet newspaper, this makes a nice soft bed for them.

4. Add food scraps and newspaper in the top bin. Worms will work their way up to eat the food. Worms are mostly vegans, they like most fruits and veggies , coffee grounds and egg shells are nice. Please don’t feed the worms oily or fatty foods, meat,  dairy, sugar, processes foods, and please no citrus fruits such as lemons and oranges.

5. Put lid on the top and keep in shady spot.


IMG_4927

The students love using power tools in the garden. Here students are drilling holes in the bottom of the bin so worm castings can be harvested.


Nature Journaling Week 3


photo4

For our third week in the garden, we started with a pebble meditation, where students do a silent walking meditation while gathering four pebbles. We all walked across the entire garden to a shady area under some trees, since it was an uncharacteristically warm late winter day in March. The pebble meditation helped the students relax and focus their intentions for their garden time after their long and active day at school. The skills the students learn by practicing meditation can help them manage stress and connect with their own thoughts and feelings during a time in their lives when they are growing and facing new struggles and stresses.

photo8

After meditating peacefully in the shade, we made our way back to the outdoor classroom circle and shared some poems from the previous week. Students were encouraged to look at one another’s progress in the garden journals to get ideas and appreciate their classmates’ work. After sharing, students did a group observations activity to collaborate on expanding the way they are making observations in the garden. The students worked together in two large groups to make observations about two plants in the garden.

photo3

Here a student makes a list of as many observations as they can about this Rock Rose

This activity really helped all the students make more detailed observations in the garden.

photo5-1

Zoomed in sketch of the Pride of Madeira


Natural Journaling Week 2


photo5

Following a garden rule of “Getting dirty!” while sketching his plant.

For the second week of our six-week Nature Journaling curriculum in the garden, the students focused on getting to know the plants they chose better by drawing them from different perspectives and beginning work on an observational poem about their plant.

Ms Castro says, “It is amazing to see how much the sixth graders discover in the garden about nature and about themselves each time we get to have our class time with Miss Lindsey. All through the previous week, the students eagerly awaited Friday, our day to have class in the garden.”

photo2

When the students arrived at the garden, we started off the class by leading a chanting meditation, which was a new experience for many of the students. My thirty students “OM-ed” uncertainly at first and then quickly gained confidence. What a neat sound to hear, of eleven year olds focusing on trying something new with an open mind!

After meditating, the students went to their plants and drew them from three different perspectives. It was fun to see students taking this assignment seriously and drawing their plant from close up, far away, and from a new perspective in-between. This time offered students the chance to get to know their plant on their own and focus on learning by observation about their plant.

photo-4-1

Zoom In/Zoom Out activity with three sketches.

The next activity was for students to make more observations through writing by listing ten things that their plant reminds them of, then plugging in these analogies to a poem that we posted in the outdoor classroom circle on the whiteboard. This was great practice for writing using figurative language and sensory details, and the students could touch and smell their plant to add depth to their writing, an opportunity we don’t often have in the traditional classroom setting.

photo-6-1

Poem student created about their plant using figurative language.